Today's Article is brought to us by GaNda.
Creator of GaNda!Comics and the Adventures of KUNOW MA-RE. Because of the nature of this tutorial article larger images are preferable to small ones. Because of the size limitations of our format though I decided to put the images in thumbnail form. Click on the thumbnail images to see larger versions of the images. Additionally, if you'd like to try out this tutorial with the original scanned image, GaNda has graciously provided the file so you follow along.
You can download the 27 MB file here. - Rob
CRISPY CLEAN INKS.
A quick guide to clean your inked pages with Photoshop.
by GaNda!
Cleaning out the inked pages and getting them ready for the digital world. I keep finding the best way to go about this is by starting out scanning the inked page in grayscale or true gray mode only.
The reason is to have more control editing the image during the cleaning process in Photoshop.
All other scanning modes (I guess this depends on the scanning software) do the editing on the image before it gets into Photoshop and this in turn cancels out having Photoshop in the first place, having said that I am sure there times those other scan modes are valid depending on the type of look the creator is looking for.
After the initial pencils and everything is more or less the way I want it to be and the page has been inked a good rule of thumb is to waste a few more minutes on the page and using an eraser to clean out any access pencil smudge.
I am not a very clean artist and most of my drawings are always dirty, I don't know if that has anything to do with the fact that I am a lefty but that's the impression I got during my schooling days!
Removing access pencil smudge helps during the scanning and cleaning process, after erasing the page I usually add in the blacks.
I use an old all in one brother printer/fax/scanner and some other USB stuff I never quite figured out and have no need for.
I ALWAYS scan the page at 600x600dpi resolution the bigger the file the more leverage you have with it and this is great for creators wanting to manipulate their stuff later, in addition to this as I previously said my scan type is ALWAYS grayscale or true gray I do not touch any other settings since I will be doing this in Photoshop. | |
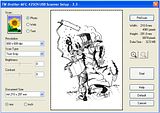
Scan settings in preparation of scanning the drawing into Photoshop, this is pretty much the most I do with it. The main items are RESOLUTION and SCAN TYPE.
I agree scanning at this size it is burden for older computers and maybe older operating systems but the good news is it is possible to do the same at 400 dpi or even 300 dpi scan resolution though 600dpi shouldn't be a major issue any more for most computers also computer memories have improved a lot.
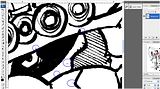
I have zoomed into the scanned page to emphasize acouple of items. (zoomed in area on page is around the eye of the character)
After the initial scanning of the page the next thing to do is select the IMAGE menu in Photoshop then Adjustments > LEVELS.
(If you want to be sure what mode you are in do that by selecting IMAGE>MODE>... this will tell you the exact current mode.)
The levels section is where we can play around with the black and white range of the scanned drawing.
Of course I am simplifying it here just for us to understand the main use of these total ranges and color balances with use of inked pages for now keep the black and white range in mind.
The levels dialog box shows a black triangular shape and a white triangular shape
I first move the white triangular shape towards the left or center, this will highlight the page.
What this is actually doing is removing stuff that isn't inked as the tendency of these types of lines are gray or light gray but never black like the inks on the page. The further you move it towards the center (left) the more highlighted the lines become, so much so that you would think that the inked lines will vanish too but this depends on the weight of the black line, experiment with this and see where your limit is on the range for the highlights, I usually stop when I see that all penciled lines (gray/light gray lines) have been removed completely from the inked page.
Next move the black triangular shape towards the right center.
This darkens the inks, so let's say to clean the page of the pencils you really lighten up the page and the blacks now don't appear so black but with this black triangular move to the center (right) you darken all the cleaned lines back to some satisfactory state.
Of course there may be some dirt remaining in the drawing, simply because they are neither too dark nor too light to be removed by the levels option we have just used, this shouldn't be a problem since there is still one more step to complete before the page is ready and that step is called turning the page into a BITMAP with the assistance of 50% THRESHOLD. This simply means to make the page read only in two colors black and white, because this is what we have a black and white picture, any color shade in-between will be deleted if it is not dark enough and is translated as white or if it is dark enough and be translated into a black color. This is because of the 50% threshold that makes the two color bitmap in high contrast. Good! That's what we are looking for!
The extra zoomed in area of the inked page shows us that there is some gray and it is not really crisp.
In the menu IMAGE>MODE>select BITMAP> this in turn will give us the below Bitmap dialog box with a number of selections to choose from.
The resolution section of course we'll leave as is, for the METHOD section use 50% Threshold then hit the OK tab for the magic to appear.
Instantly the grays are gone and the inked page is now simply BLACK and WHITE... GOOD!
Obviously there is probably some dirt still hanging around on the inked page. Well I'll introduce you to the virtual eraser

,select it and clean the drawing as you see fit.
Once it is ready don't forget to save in TIFF mode for future use if needed.
READY.
This is the stage you can now edit the image size according to your website requirements and add some text as needed to complete the drawing!
NICE!
ALL DoNe!


